
What is 3D printing?
- An additive manufacturing process for construction of 3D object from CAD file
- Different techniques of 3D printing, including
- Fused Filament Fabrication (FFF) or Fused Deposition modeling (FDM) (https://3dprinterpower.com/fff-vs-fdm/)
- Stereolithography (SLA), DLP or LCD (https://all3dp.com/2/dlp-3d-printer-digital-light-processing-explained/) - resin-based approach

- Selective Laser Sintering (SLS) (https://youtu.be/sRC8W77MlrY?si=oVZ7CkE36utrWrUR) - powder-based approach
- Comparison between FDM, DLP, SLA
- More printer types
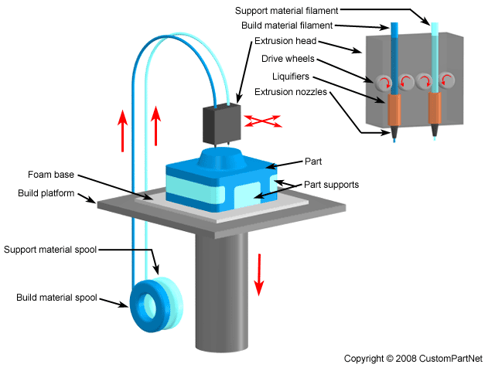
How does FFF/FDM work?
 (source: https://all3dp.com/2/fused-filament-fabrication-fff-3d-printing-simply-explained/)
 (source: How Does The FDM 3D Printing Technology Work? | Manufactur3D)
Important concepts:
- Filament is brought in by "cold end" and heat up to molten form at "hot end" and squeeze out through nozzle
- Squeezed out molten material (extruded material) get deposited onto the 3D object under construction, layer by layer
 (source: Fused Filament Fabrication – Simply Explained | All3DP)
Benefits of FFF
- Large selection of materials, including many common thermoplastics, wood and metal-infused thermoplastics, and even food (such as chocolate).
- Least expensive printer technology.
- Least expensive materials.
- Easy to switch materials.
- Possible to print using multiple different materials.
- Printers and materials offered by many manufacturers.
- Relatively easy to build your own printer.
- Fast printing.
Major disadvantages of FFF
- The detail of finished prints is limited by the size of the nozzle. Other technologies offer higher detail.
- The strength of finished parts is limited because each layer is joined to the layer below it.
- Need to waste some support material due to gravity
(source: Introduction to Fused Deposition Modeling (FDM) - University of Maryland)
- Have layer pattern on the side
source: Fused Filament Fabrication – Simply Explained | All3DP
Material
Build material
PLA (Most commonly use)
- melting point: 180C to 220C
- soften at 60C (glass transition temperature)
| Material | Properties |
|---|---|
| PLA (polylactic acid) | Excellent surface quality and detail. Mechanical and heat properties not suitable for some applications |
| ABS (acrylonitrile butadiene styrene) | Strong, ductile material with wear resistance and heat tolerance |
| Nylon (polyamide) | Strong yet flexible, with good chemical, impact, and abrasion resistance |
| PETG (polyethylene terephthalate glycol-modified) | Good toughness and wear resistance, with chemical resistance against many industrial fluids. |
| CPE (copolyester) | Durable and flexible with a glossy finish and good impact and heat resistance |
| PC (polycarbonate) | Strong and tough material with heat resistance up to 110 °C |
| TPU (thermoplastic polyurethane) | Flexible material with rubber-like properties. Provides high impact and wear resistance |
| PP (polypropylene) | Durable, tough, and fatigue resistant. Retains shape after torsion, bending, or flexing |
| PVA (polyvinyl alcohol) | Water-soluble material used to create supports for overhangs and cavities |
source: What is FFF 3D printing? - UltiMaker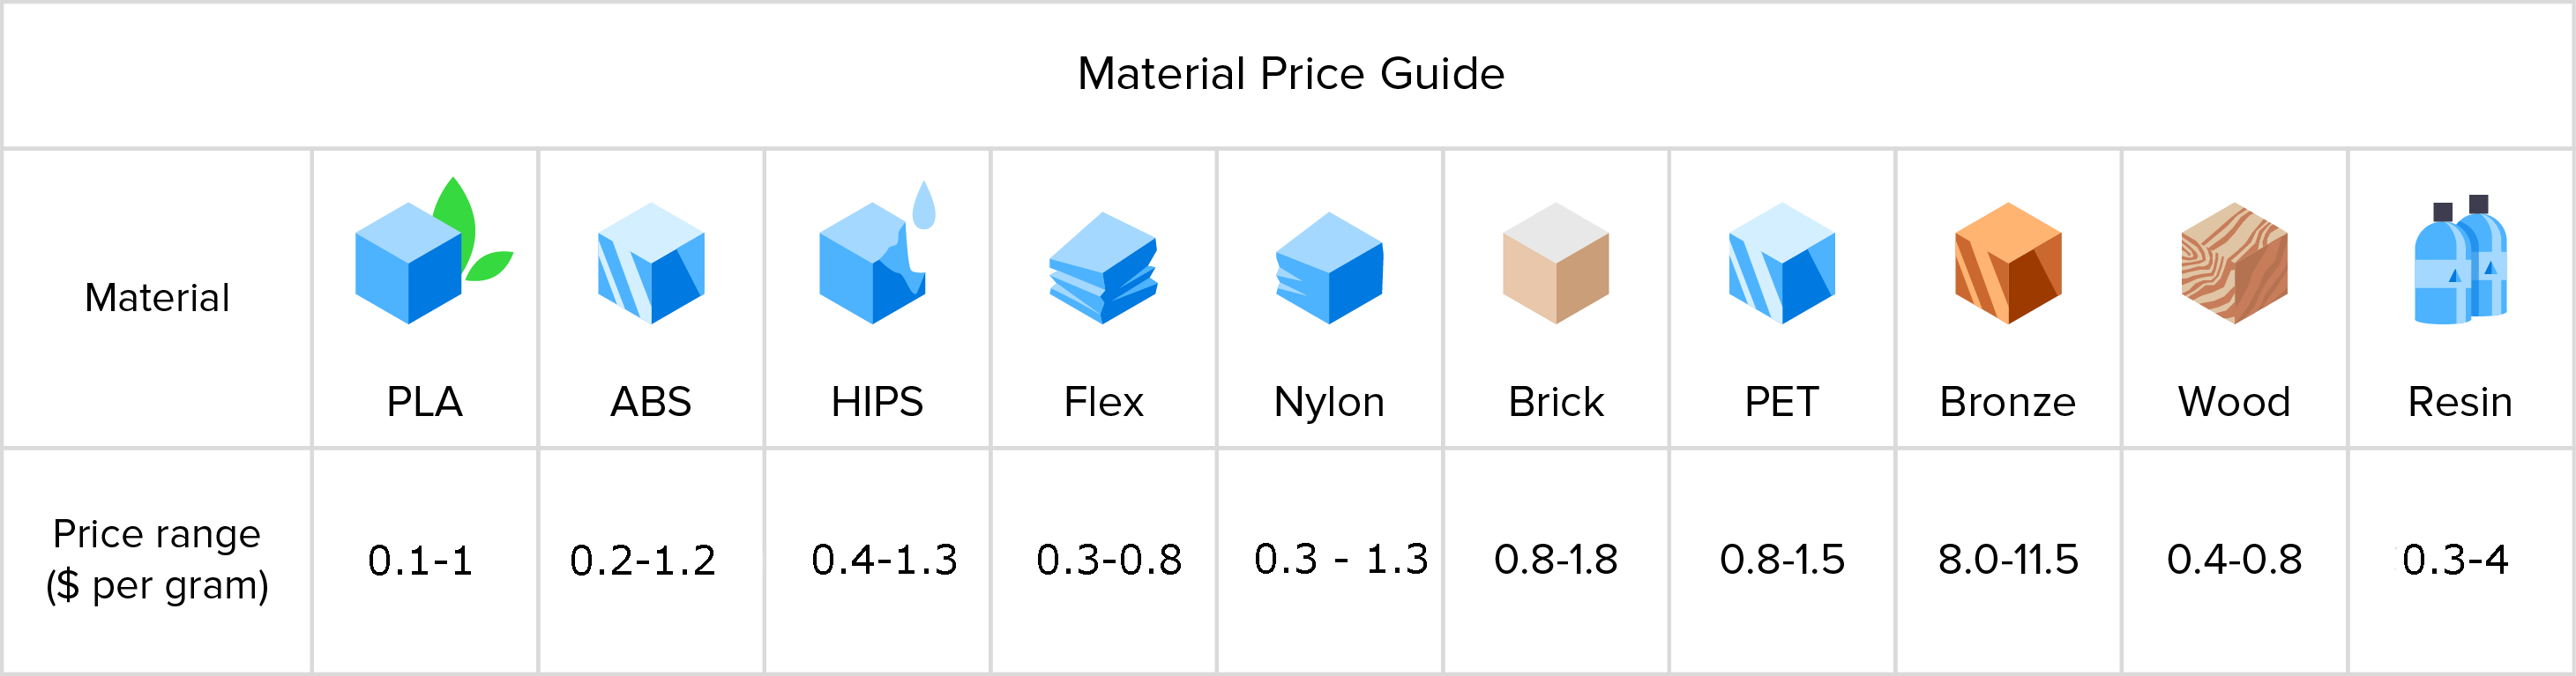
source: How much should I charge to make prints? Help Center
Support material
Using normal build material for support:


The following is some introduction of Bambu support filaments:
Types of support filaments | Support W, i.e. Support for PLA | Support for PLA/PETG | Support G, i.e. Support for PA/PET | |
Types of body filaments that are compatible | PLA, PLA-CF, etc. | PLA, PLA-CF, PETG, PETG-CF, etc. | PLA, PLA-CF, PETG, PETG-CF, etc. | PA, PA-CF/GF, PA6-CF/GF, PAHT-CF/GF, PET-CF/GF, etc. |
Characteristics | 1. Easy to remove; 2. High surface quality; 3. Insensitive to moisture, and not strict with drying and moisture proofing | 1. Water-soluble, and suitable for those models that are not convenient to remove with hands and tools; 2. Easy to remove; 3. High surface quality; 4. Sensitive to moisture, and very strict with drying and moisture proofing. 5. Please refer to this wiki before use: PVA Printing Guide. | 1. Easy to remove; 2. High surface quality; 3. Sensitive to moisture, and very strict with drying and moisture proofing. | |
Recommended settings | 1. In most printing cases, it‘s recommended to print the support interfaces with support filaments, and print the support bases with body filaments, so that a lot printing time can be saved. 2. In some special printing cases, it's able to print both the support interfaces and the support bases, i.e. the whole support structures, with support filaments. However, it may leads to bad printing results when it comes to support structures that are thin and tall and deforming or falling during printing. | |||
*Bambu only have 1 nozzle, the following picture just for showing we can use support material for support part in FDM printing. Bambu is able to switch material on same layer by using AMS.
 (source: A Guide to FDM Printale Plastics and 3D Printing Filament | 3devo)
Extra:
3D Printing Materials Explained: Compare FDM, SLA, and SLS
Common problem affecting printing quality
Bad filament quality (e.g. brittle when filament absorbs moisture over time)
What Effect Does Moisture Have on 3D Printer Filament Storage?
 (source: What Effect Does Moisture Have on 3D Printer Filament Storage?)
PETG quality difference with different moisture contamination
Flow Rate and Filament Moisture
Mass flow rate is directly correlated with the moisture content of 3D printed filament. Higher moisture content yields the lowest viscosity and the highest mass flow rate.
While high flow rates are generally desirable, an unregulated flow rate leads to over extrusion.
Indications of Possible Moisture Content in Failed 3D Printing Builds
- Filament cracks or makes popping noise as the filament is pushed through the extruded
- Holes in the top of parts
- Extruder tip bubbles with a tiny burst of steam, stringy or drooly
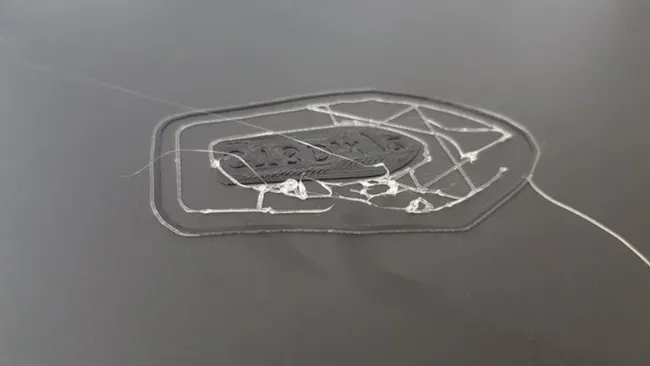
- The filament will not adhere to the print bed
- Repeated builds seem inconsistent or fail no changes in variables
- Extruder motor stops but filament keeps coming out
- Extruder motor starts but filament extrusion is delayed
- Parts become soft, fragile, and break easily
- Extruder jams
How to quickly check if the PLA filament is wet
Unsuitable Temperature
Nozzle temperature (melting point)
- whether printing material is melt properly
Heat bed or build plate temperature (glass transition temperature)
- whether extruded material can stick onto the build plate
 (source: Soluble Filament not sticking to bed - UltiMaker 3D printers - UltiMaker Community of 3D Printing Experts)
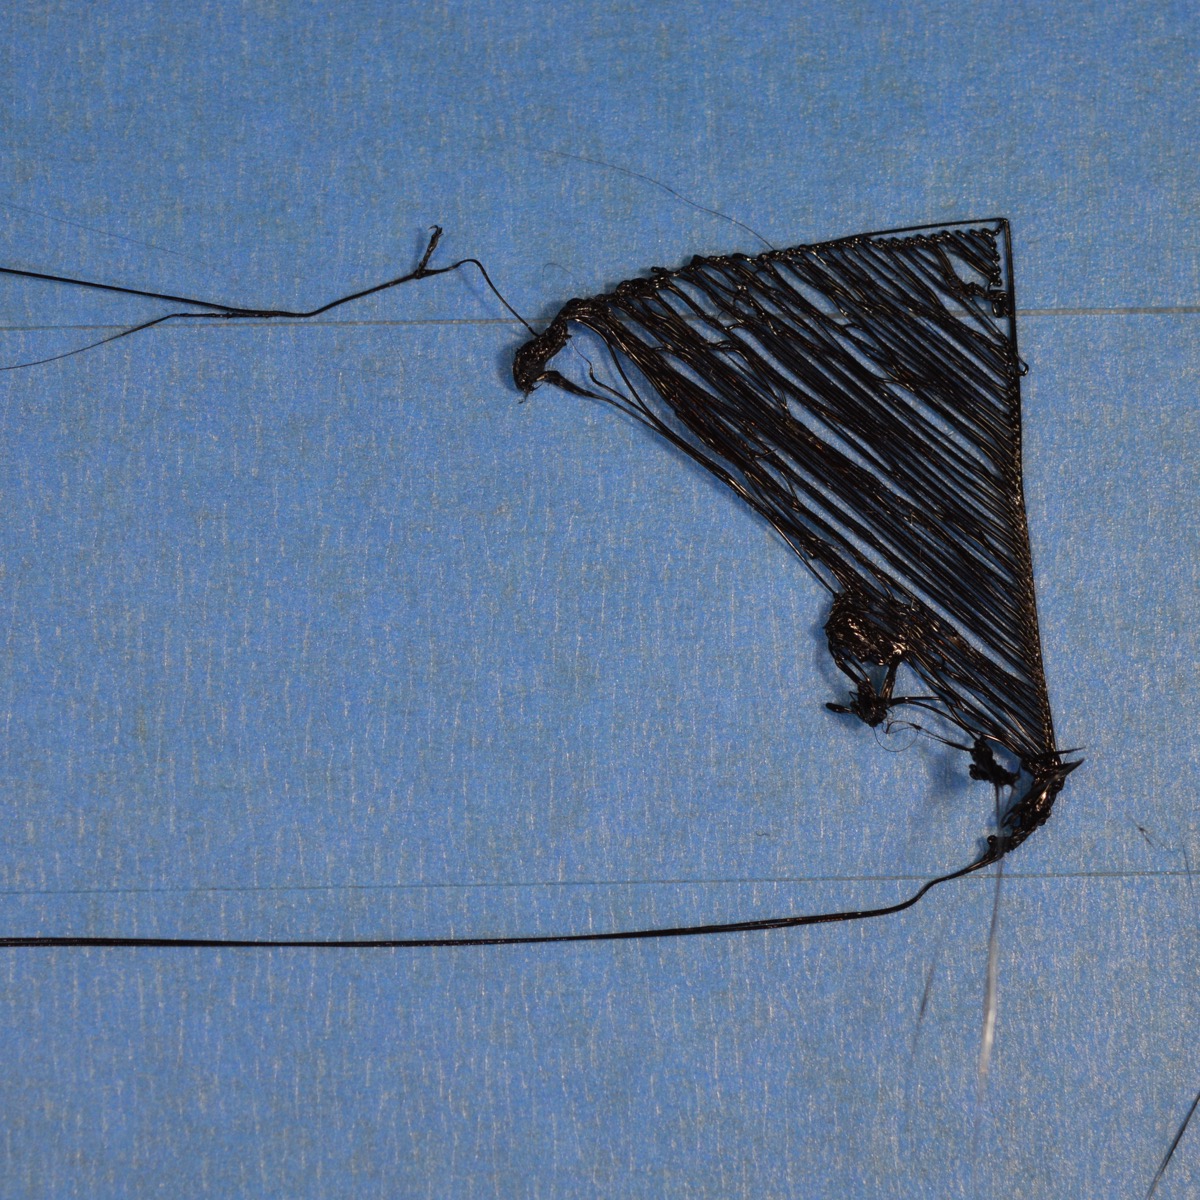 (source: Not Sticking to the Bed | Simplify3D Software)
Enclosure temperature
- whether temperature of the object under printing can be properly controlled so that extruded material can stick to subsequent layers
Clogged in extruder
https://youtube.com/shorts/NNLzOippOxo?si=JDqaPiB26ZHYR8q6
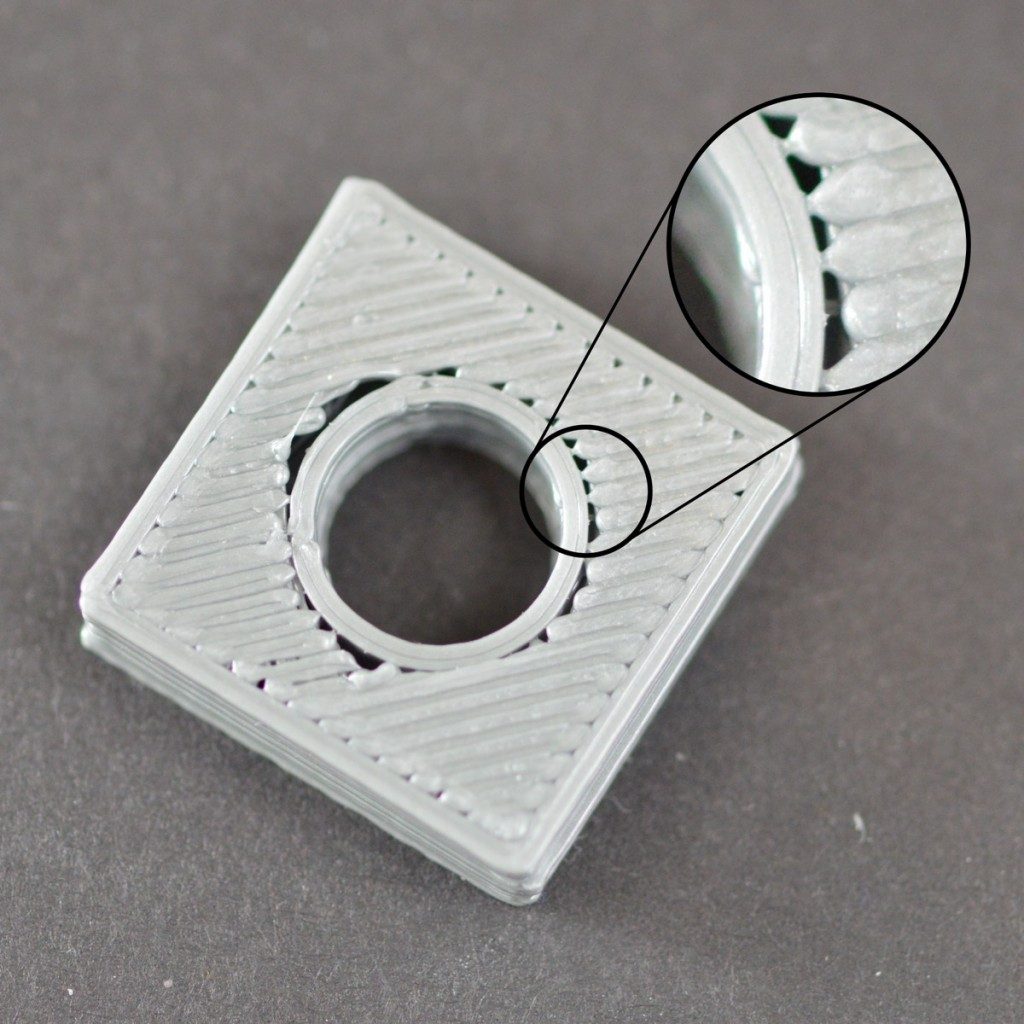
Under-Extrusion
 (source: Under-Extrusion | Simplify3D Software)
Over-Extrusion
 (source: Over-Extrusion | Simplify3D Software)
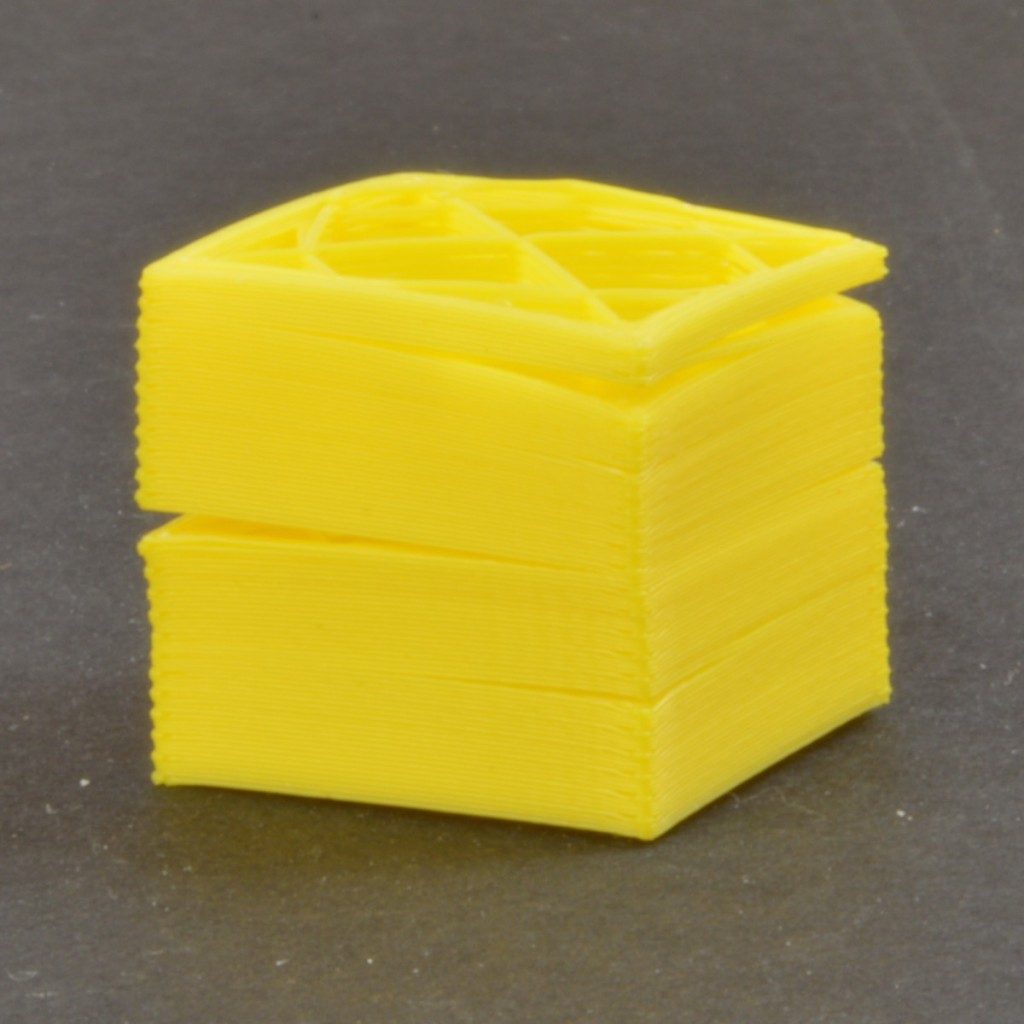
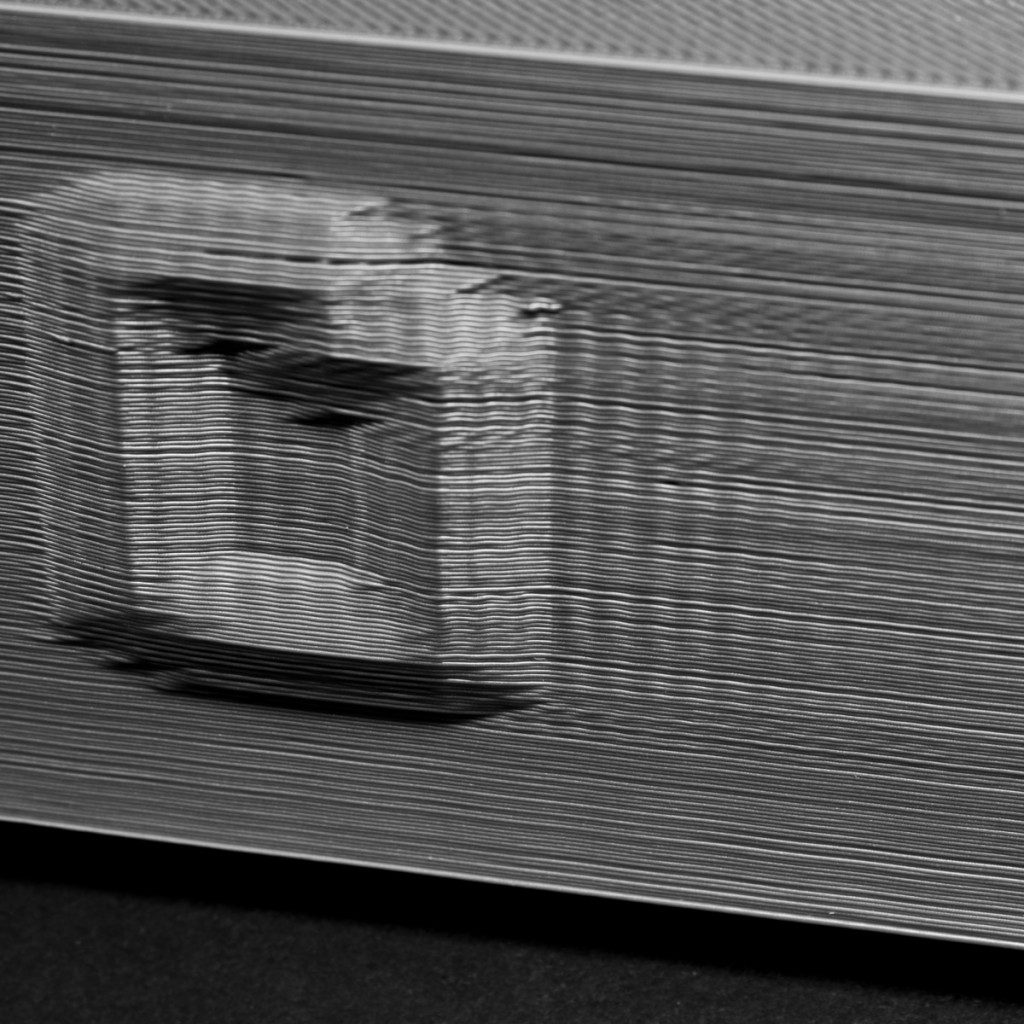
Overheating
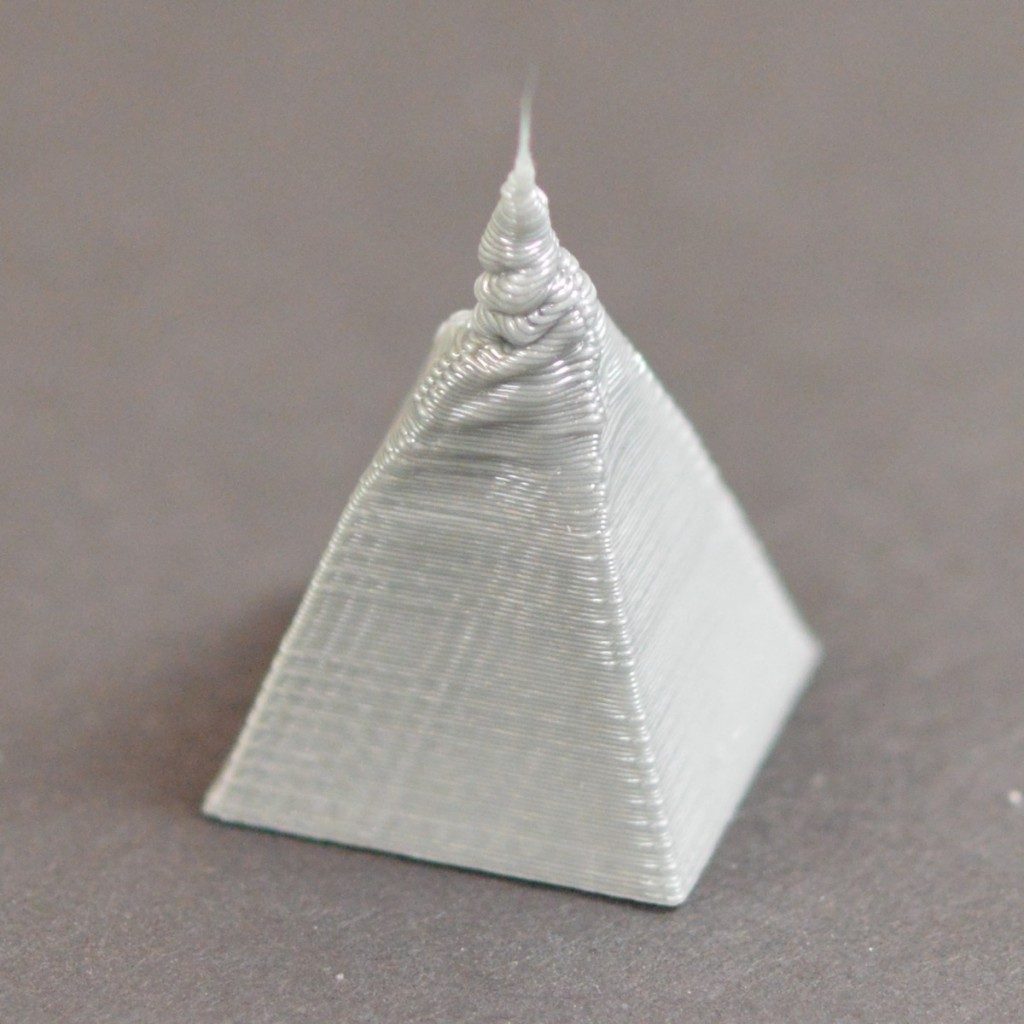 (source: Overheating | Simplify3D Software)
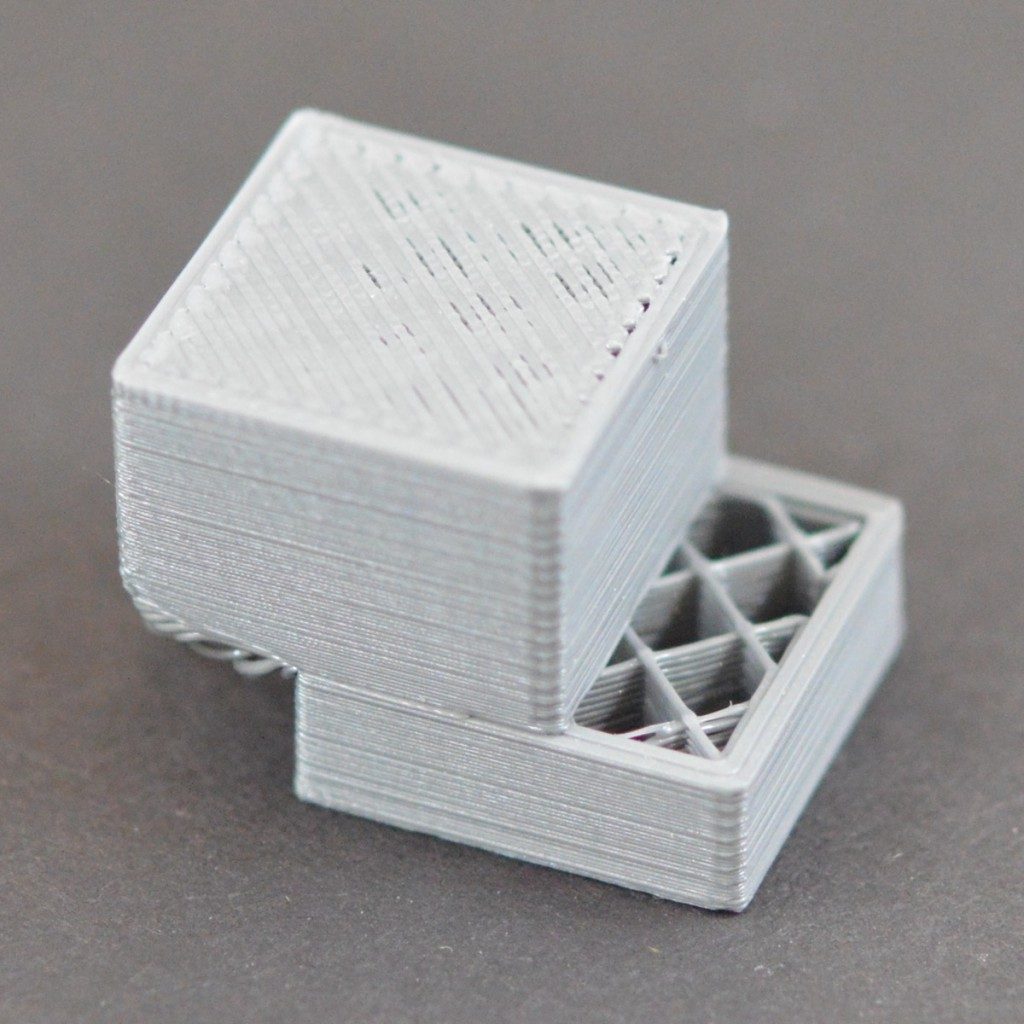
Gaps in Top Layers
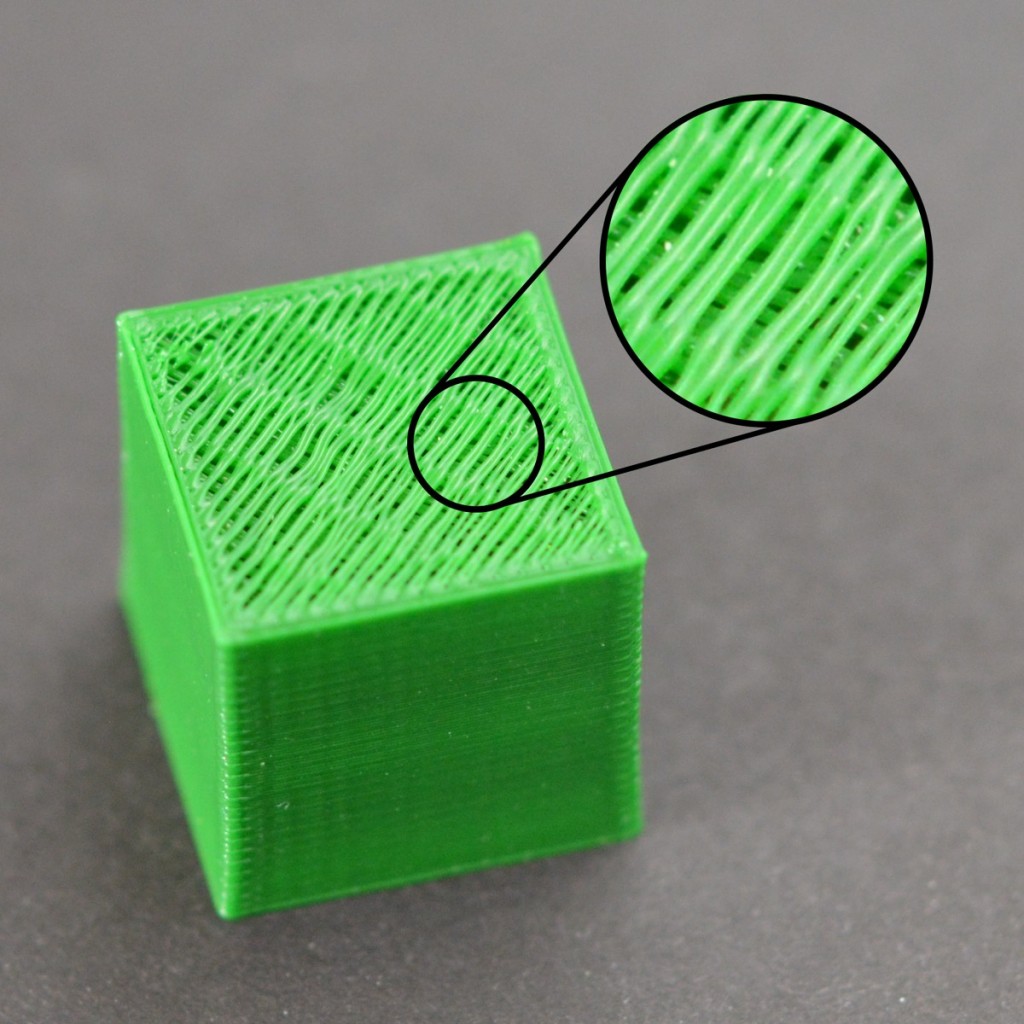 (source: Gaps in Top Layers | Simplify3D Software)
Weak Infill
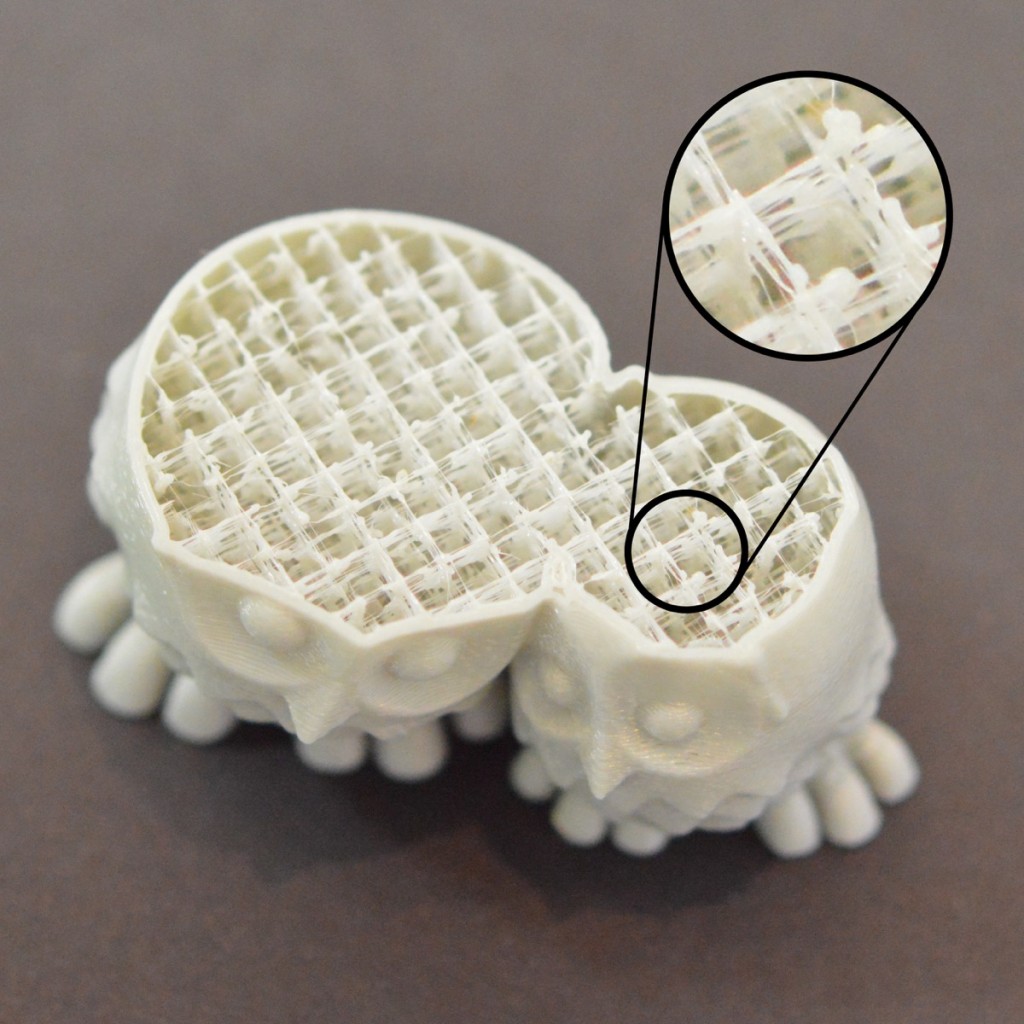 (source: Weak Infill | Simplify3D Software)
Gaps Between Infill and Outline
 (source: Gaps Between Infill and Outline | Simplify3D Software)
Inconsistent Extrusion
 (source: Inconsistent Extrusion | Simplify3D Software)
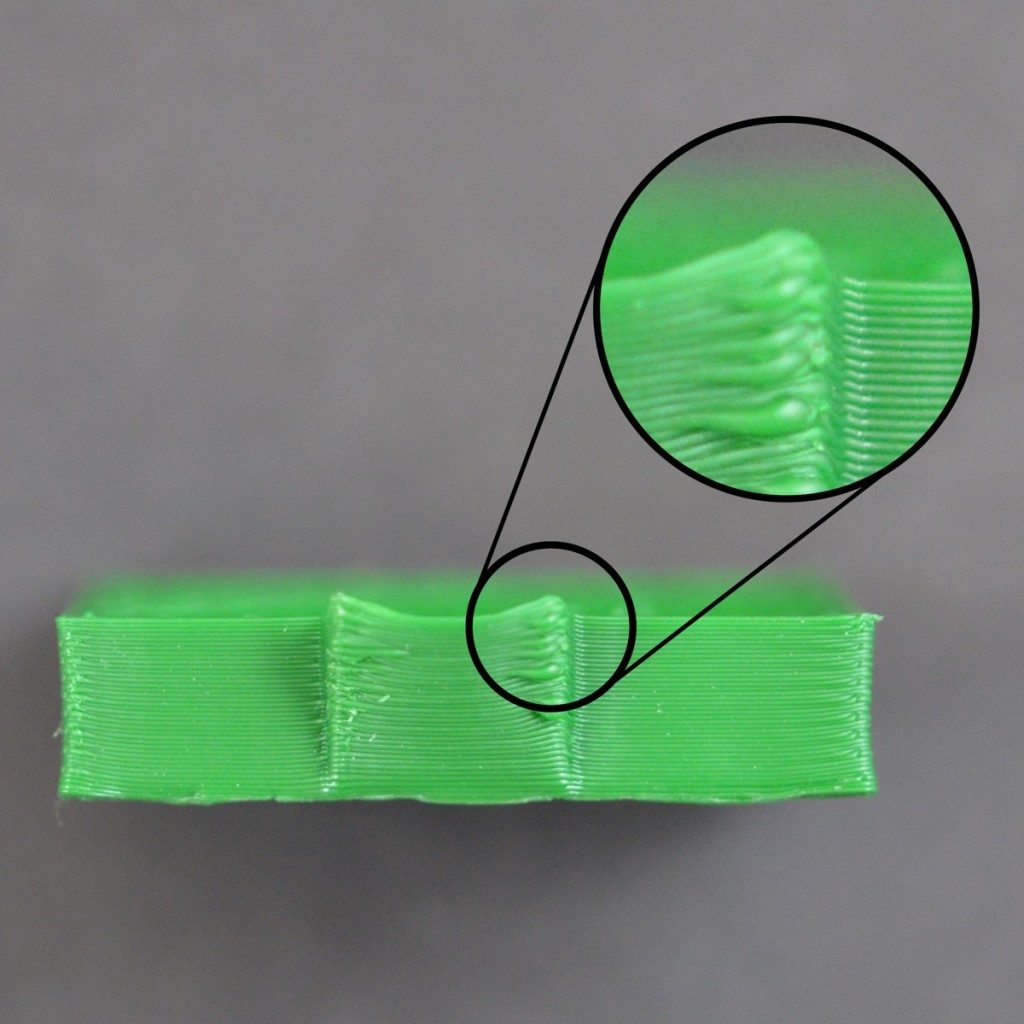
Stringing or Oozing
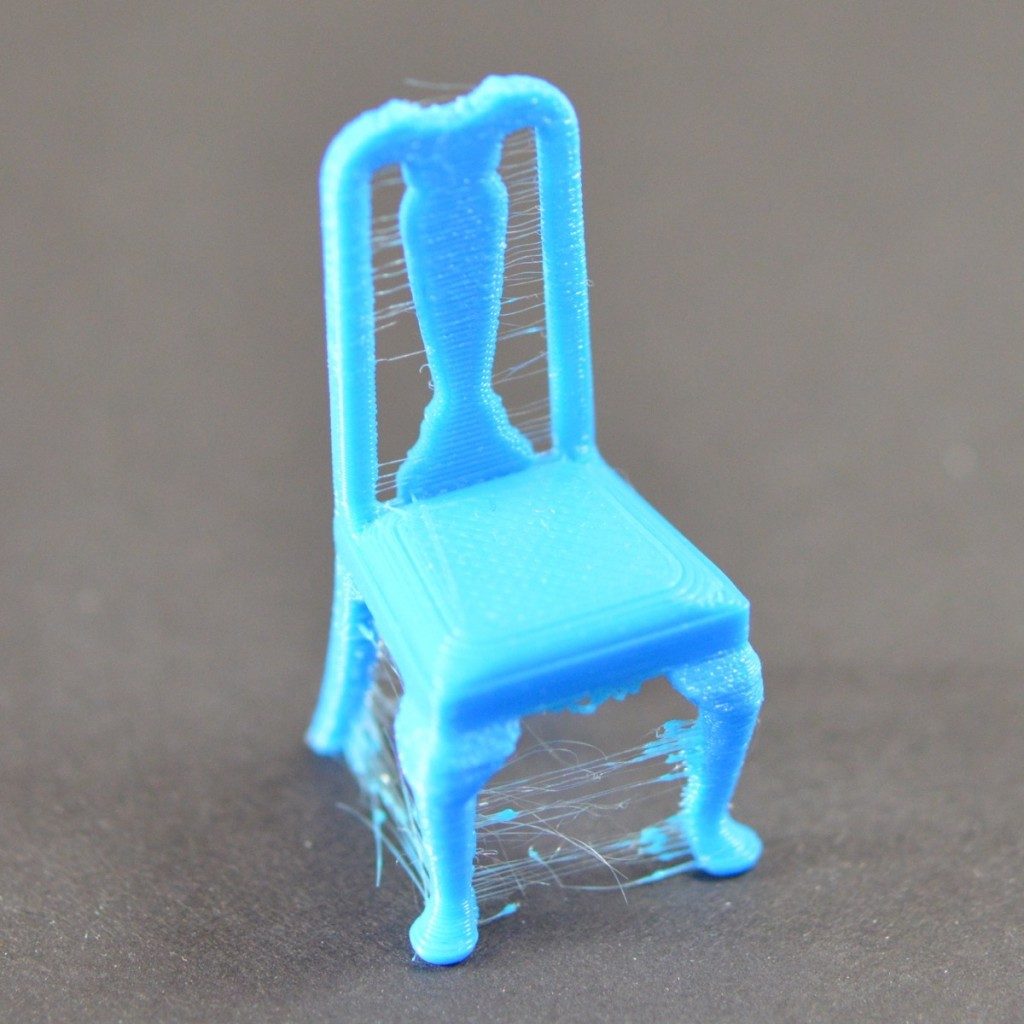 (source: Stringing or Oozing | Simplify3D Software)
Layer Shifting
 (source: Layer Shifting | Simplify3D Software)
Warping
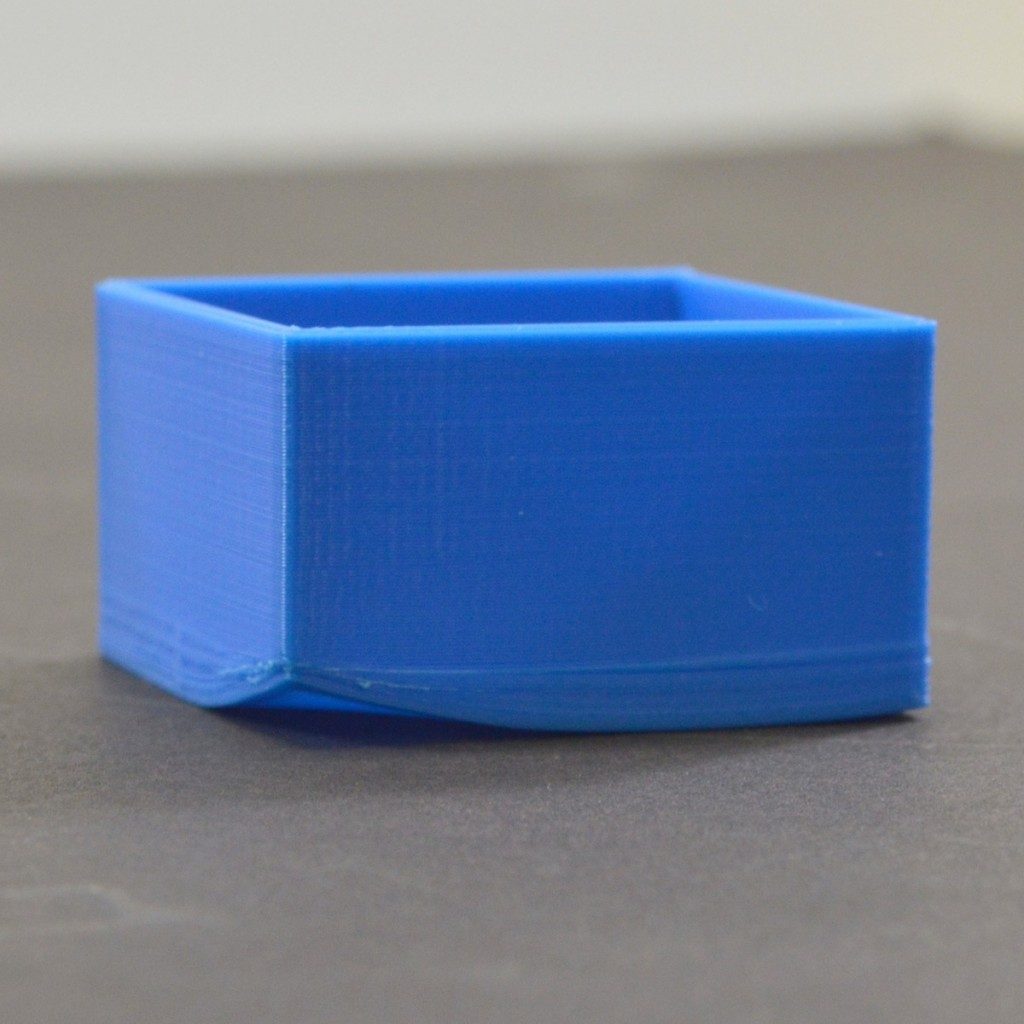 (source: Warping | Simplify3D Software)
Layer Separation and Splitting
 (source: Layer Separation and Splitting | Simplify3D Software)
Vibrations and Ringing
 (source: Vibrations and Ringing | Simplify3D Software)
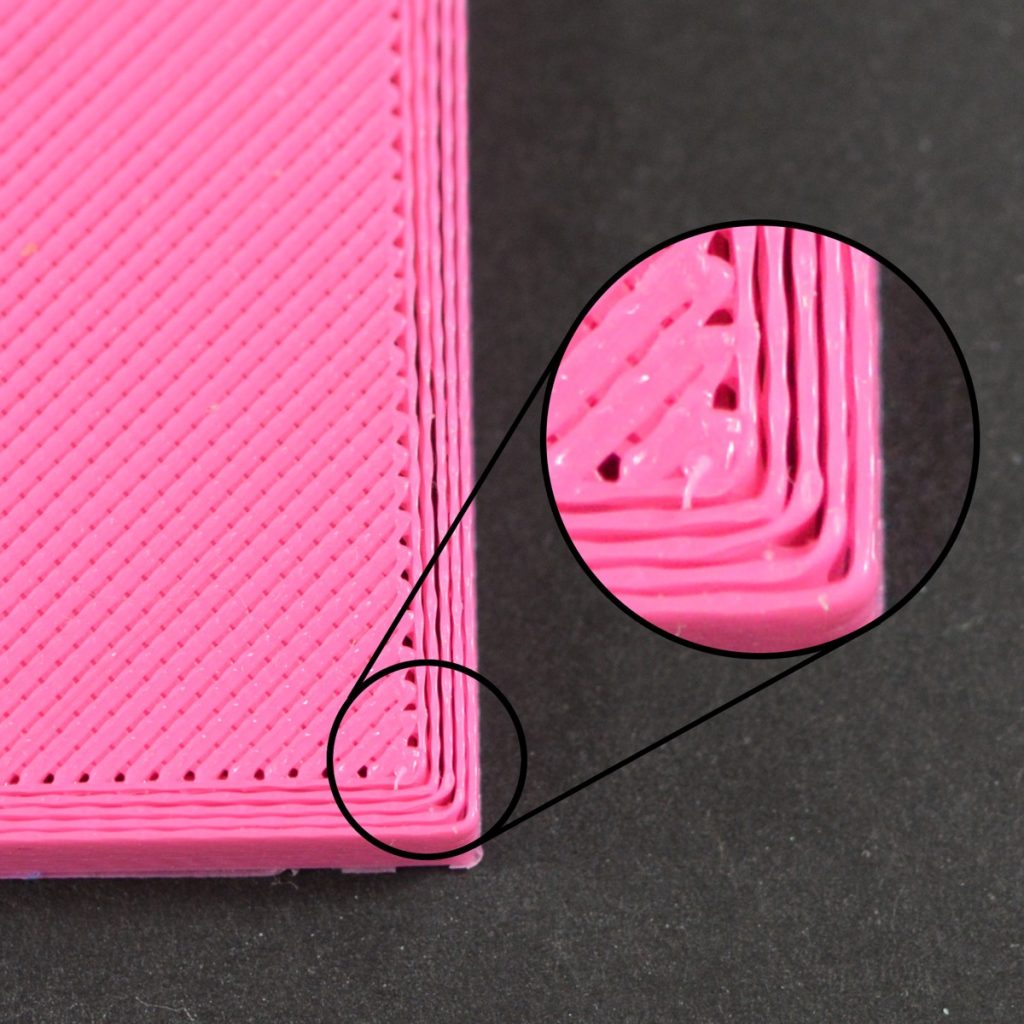
Curling or Rough Corners
 (source: Curling or Rough Corners | Simplify3D Software)
More refers to: Print Quality Guide | Simplify3D Software
For bambu: Common print quality problems and solutions | Bambu Lab Wiki
3D printing works smoothly when ALL the followings are satisfied:
- filament is brought by the "cold end" continuously and get into the "hot end" at the appropriate speed
- hot end is hot enough to melt the filament so that it can flow out continuously, but NOT too hot to make the material too "runny" or even burn them
- extruded material should stick to the heat bed or build plate at the first layer, or to previous layer of the object under construction
Refer to https://3dprinting.stackexchange.com/a/15950/41236 on what happens when "hot end" is too hot or too cold.
Workflow for printing a FFF 3D printing
 (source: https://www.researchgate.net/figure/FFF-3D-printing-process_fig1_355853683)
- Prepare 3D model using a CAD software (Tinkercad, Blender, Fusion360, Rhino3D, SolidWorks, ....). Make sure the 3D model is "water-tight".
- Export 3D model as STL (or STEP in case of Bambu Lab Studio)
- Use a slicer software to convert the STL file into G-code file (or .gcode.3mf in case of Bambu Lab Studio). G-code is the language for describing instructions to control operations of a FFF 3D printer while 3D printing.
- Send the G-code file to the 3D printer, and execute instructions in the G-code file on the 3D printer
- 3D printer operates according to the G-code to complete the printing.
Slicer Software
To slice your 3D model into layers, and convert those layers into print sequence, and generate the G-code file or send it directly to your 3d printer.
Bambu Studio Quick Start Guide | Bambu Lab Wiki
Bambu Slicer Introduction (Bambu Studio)
- Download in https://bambulab.com/en-us/download

- Follow the instruction on Installation (No need to follow the version)
Windows:
Mac:
simply open the .dmg file then copy the Bambu Studio app to the Applications folders on your Mac.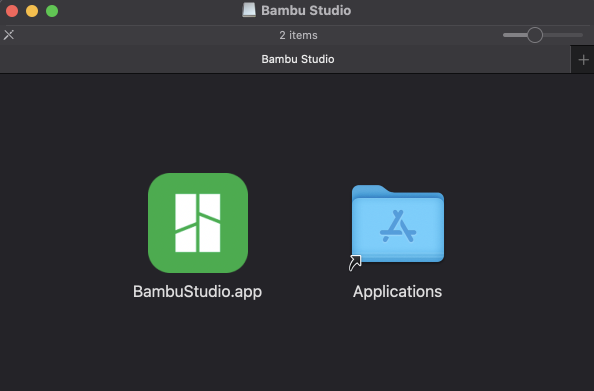
- Open Bambu Studio

- Choose Asia-Pacific

- You can choose skip or Join the program, it doesn't matter

- Clear all selection, only choose Bambu Lab X1 Carbon 0.4mm nozzle

- Filament Selection doesn't matter, just click Next

- MUST install Network plug-in

- Click "Prepare" to switch to build plate view, make sure you choose the "Bambu Lab X1 Carbon 0.4 nozzle" and the plate type is "Smooth PEI Plate"

Slicing Technique
Overhang
Slow Down for Overhangs | Bambu Lab Wiki
Common print quality problems and solutions | Bambu Lab Wiki
Bridge
Bridge settings | Bambu Lab Wiki
Common print quality problems and solutions | Bambu Lab Wiki
Support
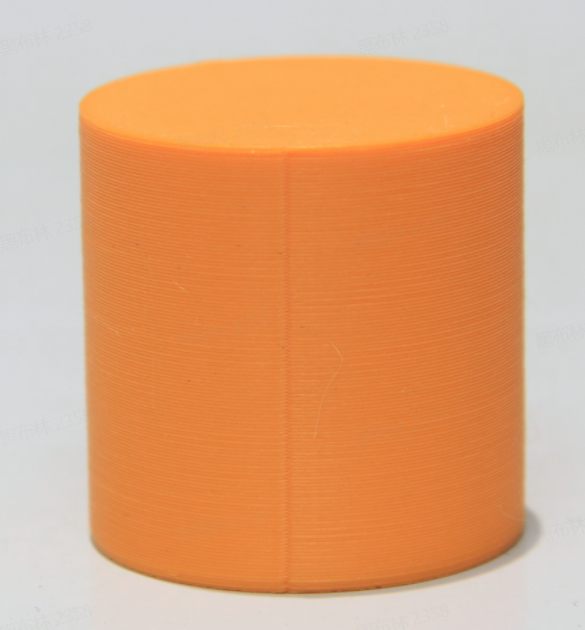
Seam
Seam settings | Bambu Lab Wiki
The seam is a kind of gap between the start and end points of each perimeter of the layer( Unless you enable the Spiral Vase mode, refer to Spiral Vase | Bambu Lab Wiki). It leaves vertical seams on the surface of the model, which is unavoidable in FDM 3D printing. Seams can be well hidden on irregular surfaces such as those with concave and convex vertices. On the other hand, some models with circular surfaces (such as cylinders) will not be able to hide the seams, which will be very obvious.
Print by object
Print-by-object | Bambu Lab Wiki
When there are multiple print objects in one plate, you can choose to print multiple models at the same time (by layer, the default print sequence), or you can choose to print them one by one. Print-by-object can reduce stringing and oozing caused by traveling between models. And if one model fails, it usually does not affect the printing of the other models when using this mode.
Files for 3D Printer Test
Bambu Operation process
AMS (Automatic Material Management System)
- For switching between multiple materials while printing
- Auto filament load and change
- Humidity measurement and control
Introduction to AMS | Bambu Lab Wiki
First layer Inspection


Bambu X1-Carbon inspecting the first layer #thingiverse #3dprinting #bambulab #3dprinter #video
Spaghetti

